We both admired how cute it was and Becca told me she was going to pin it for me, kind of as a joke in a you-should-make-this-but-we-both-know-you-probably-never-will type of way.
Little did she know, I LOVE dream catchers...and most things Native American really. And with this feminine look I had my heart set on one of my own. Plus, I knew I already had most of the materials at home.
When I got home I looked up a couple more dream catcher wreaths like this one:
And decided to wing it making my own with what I had. So here's my outline of making a dream catcher wreath:
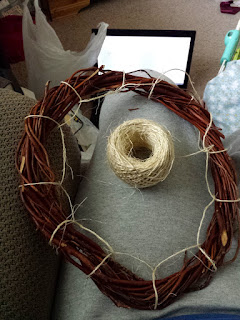
First of all you need a wreath -I happened to have this one I had purchased last year at the dollar store, for a project such as this - and some twine or string. I picked my most frayed twine for the shabby-chic type of look.
Note: If you want the wreath a pretty color like the top example, make sure you spray paint it and let it dry first. I wanted it the pretty blue in the example, but I didn't have any cute colors of spray paint and I wasn't willing to wait to go out and buy any. I just went with what I had.

Having made a dream catcher in 5th grade, I knew the basics of how to weave the rope, but I looked up this tutorial online and followed it until I got the hang of it again on my own.
It really isn't hard, don't be intimidated, just make sure, after the initial loops, that you pull the strings tight.
Also, don't forget to plan ahead where you want your beads, because you can't go back and place them without undoing what you've already done. I raided my daughter's beads for the colors that I wanted.
 It only took about fifteen minutes to finish stringing the dream catcher. I finished the middle by just pulling the twine across, rather than using a middle piece like in the tutorial, or leaving a small hole as I read in other examples. Just make it look however you like!
Once I had the actual dream catcher made, it was onto sprucing it up. I dug out all my fake flowers and cut up the ones I wanted and arranged them on the side. Then I used my hot glue gun to attach them.
My hot glue melted some of the flowers and made them wither, so I had to make sure to only put it on the firmer stems of those ones. I would just test how any of your flowers react before you slather hot glue on them and they are ruined.
Once my flowers were fastened, I dug out my burlap and old ribbon scraps that I keep in my crafting supplies.
After digging through and finding what I liked, I roughed up a bow of burlap to make it slightly frayed, and glued it on the bottom. (I love the cute little bow on the first example, but decided I wanted my bow to hang long like feathers usually do off of dream catchers.) After attaching the burlap, I made a bow out of a sheer pink ribbon, and glued that on top of the burlap.
Then whala! My wreath was all prettied up and finished!
See, easy! And really, it looks much better in person than in these pictures. I really love it. It's so springy and sweet. And now hopefully all the evil will be kept out of our house and we'll only have sweet dreams.


Super cute! I love it!
ReplyDelete