Saturday, December 24, 2011

Temple Square 2011

Before we left for Washington State to spend Christmas with my family, we took the kids to see the lights at Temple Square and we had a great time.


Brigham pushed the children in the stroller. It was really busy downtown with no parking because we unknowingly choose to go on one of the Tabernacle Choir performance nights. Even our secret lot was full (I swear I'm going to hunt down whoever let out our secret) and we ended up having to park in a church parking lot far away and up a big hill.


Here we are in front of the big Christmas tree out front. It wasn't too cold and it was a clear night.


The big Christmas tree in the Joseph Smith Memorial Building. Every time I told Lydia to look at a Christmas tree she would just look up at the trees outside and nod. She had no idea what I was talking about.

Brigham had a stomach issue and spent forty-five minutes in the bathroom so the kids and I had to entertain ourselves in the Visitor's Center. This is what Ammon did:


He would sit there looking so sweet, and then...


That's right ladies, watch out because Ammon is one professional pucker-upper these days. He always makes this face lately - warming those lips up for later :) He also worked on his manly yelling this night. As we were walking around, he kept yelling at everyone in front of us, "AaaAAAah" (that's supposed to sound like his baby yell). People would turn around to see what was going on. It was more charming than offensive in my opinion.

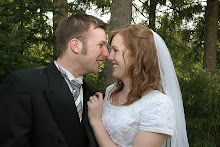
Lydia kept insisting on getting her picture taken with all of us so here are our lovely attempts.

Take 1:


Yep, didn't even get Ammon's head in there, but Lydia sure was hamming it up!

Take 2:


Half of Ammon's head, and a nose shot for me, but I do love Lydia in this one.

Take 3:


Pretty much as good as it's gonna get. I challenge you to a decent shot of yourself with two kids in a stroller.

Finally, Lydia told me she had to go to the bathroom too so I had fun maneuvering the stroller into the bathroom and helping Lydia go while watching Ammon all by myself. I ended up just letting Lydia go with the stall door left open so I could keep an eye on Ammon in the stroller in the corner. You do what you gotta do. Good thing Lydia doesn't get embarrassed if others see her go to the bathroom yet.


And if that's not the cutest picture of Lydia, I don't know what is. She may have been more obsessed with the running water and water fountains than the Christmas lights, and answers "for decorations!" when you ask her what Christmas is for, but she's adorable enough to make up for all that. She'll figure it out some day.

We had a great time (despite Brigham's momentary problems) and I think the babes had an enjoyable time too. I have to say kids make Christmas so much more fun and we can't wait to do it all again next year!

Wednesday, December 21, 2011

Dessert to Die For

Peanut butter and chocolate. Put the two together and you get heaven on earth. So many different ways to pair them and they are all good. Of course on Pinterest I can't stop pinning peanut butter and chocolate combination recipes. Especially late at night when I'm hungry and trying not to eat anything - I just pin delicious food instead.

Let me tell you I stumbled upon the peanut butter and chocolate dessert of all desserts. It's a bit pricey but I stumbled on a few sales for the ingredients that made it all worth it.

First you take brownies and mix them up normal. Then you dump a bunch of peanut butter chips in there too and cook them. Um...yum!


Letting the brownies cool, mix up some vanilla pudding and milk until it's stiff and pudding-like.


Then to the pudding you add peanut butter, yum, and some vanilla, and then fold in whip cream.


Sounds good so far. Take some mini Reeses, unwrap them, try not to eat them all, and cut them up.


Now for the layering: layer some cut up brownies and then some chopped up Reeses, and then some pudding mixture. Do it all again, until everything is used up except for a few of the chopped-up Reeses to add as a garnish on top.


I wasn't good at taking pictures of the layering because I was too excited to get it all done; but after it's layered you can add more whip cream to the top and then sprinkle the last bit of Reeses on top to make it beautiful.


Then you let it chill for awhile so everything can set up just right. This dessert is super rich, super bad for you, and SUPER delicious. One serving is enough to kill a person because of all those things.

Here's where I got the recipe from and it's even more over the top. I scaled down the amounts a bit because I didn't want to make it quite so crazy. Next time I probably won't add whip cream to the top because that was little much for me, but then again I don't care much for whip cream.

I'm going to have my chance to try again soon because I'm making it for my family for dessert Christmas night. We're all peanut butter/chocolate obsessed. Seriously, one year we all got our very own jar of peanut butter in our stockings. It was awesome. If it's got peanut butter and/or chocolate...it's for us. As if this Peanut Butter Brownie Trifle didn't tell you that already.

Monday, December 19, 2011

Cheap Baby Leggings

Baby leggings are adorable and convenient. Especially when you have a baby who is short on outfits and has a bunch of shorts that are unusable because it's winter time. The only problem is that one pair is so darn expensive!

So thanks to this site, I was able to come up with some homemade leggings on my own.

Browsing through the dollar store, I noticed some socks that were supposed to be knee highs and so I picked up four pairs of them.


However, when I got home I found out that only one of the pairs were legitimate knee highs. The rest were deceptively - well not. They looked more like this:


Longer, and yet not knee length. Despite that, I didn't want three of my four dollars to go to waste and decided to try them out as leggings anyways.

So taking a pair, I snipped off the ends...


Flipped them inside out, took some needle and thread, and hemmed them by hand...


I wish I could fit the socks around my sewing machine without stretching them out so I could zig-zag the ends down so they don't fray or curl up, but this works well enough.

Flipping them right-side-out and they look like this:


I was skeptical because they didn't look very much like baby leggings - more like socks with the toes cut off. But when I put them on my baby boy they looked like this:


Perfect baby leggings! They look just fine and they've created a bunch of new outfits for him while keeping him warm at the same time.

As long as I turn the heel of the sock to the back of the leg, you can't tell it's there at all! They just look a little bunched up.


They've lasted after being washed and Ammon's crawled all over in them and they stay on and are working wonderfully. They look mighty cute as well :)


So for four dollars I made four pairs of legging! That's a great deal!


For the knee-high socks, I cut them off right at the heel and they actually ended up shorter than the other pairs. It ends up the other three pairs work out better in the end. So if you're in the market for baby leggings and you're looking for a great deal - try the dollar store!

Wednesday, December 14, 2011

First Haircut

It was time.

Ammon's hair was constantly in his eyes and had grown over his ears and I felt bad because he was constantly itching both. And yet, I just kept putting a haircut off. Not only was giving a haircut to a constantly moving ten-month-old daunting, but his hair had just finally started laying down and I didn't want to lose any of his precious, original baby hair. It's silky and blonde and I was sure a haircut would ruin all that.

And it means he's not a baby anymore.

But he REALLY needed it.

At first, I was determined to cut his hair myself because I know he's going to need regular cuts and trims and I want to be self-sufficient in that area. That way, when I'm no longer around family that knows how to cut hair, I can do it. But when I was getting tips from my step-mother-in-law, who cuts hair for a living, I chickened out major and decided to have her do the first damage. So she agreed to cut his hair right then before I backed out permanently. She's good to me.

For our hair-cutting tactics, I held Ammon on my lap to try and keep him still and I let him do something he's never allowed to do - play with my cell phone.


So with no further ado, here are the before and afters:

Side view


Ah, so much nicer.


See how scruffy he was becoming? I was trying to play it off as fashionable, but really it was just crazy.

He was exhausted by time we were done, but only because it was way past his bedtime and he was cranky. The actual haircut only took about fifteen minutes. We were lucky we got it cut at all.

Nonie gave me some of Ammon's hair to keep. When she first gave it to me, I panicked trying to remember where I put Lydia's locks from her first haircut. Then I remembered - Lydia's never had a haircut! Ammon beat her too it and I bet he'll have many more haircuts before she has her first one. I'll treasure those first little blonde strands forever.

It was a very bittersweet experience. While he looks so nice now, he resembles a little boy more than ever. But don't let his looks fool you because for now, he really is just my baby boy.

Monday, December 12, 2011

The Santa Experience

At the ward Christmas party Santa Claus was invited and I was interested to see how the kids would do.

Based on this picture...


...it seems as though they did pretty well. Sure, they aren't smiling and Ammon looks like a deer caught in headlights, but honestly, it's a Christmas miracle to get both of my kids looking at the camera at the same time. I love this picture.

But I have to say that this picture is my favorite:


It's my favorite because it shows perfectly what really happened on Santa's lap. Ammon clutched his silver spoon like it was a lifeline and stared at Santa with his usual sleepy-eyed, mouth-hanging-open, what's-going-on-here look. Lydia refused to look at Santa, let alone talk to him, preferring to keep her head turned away and her hands crammed in her mouth.

Poor Santa. You can tell from the look in his twinkling eyes that he's just waiting for it all to be over.

It was an adventure that was for sure. We stood in line for a half hour to meet Santa only for Lydia to tell me, one kid before our turn, that she had to go to the bathroom. So one bathroom trip later and round two through the line we got our Santa time. I should have had Lydia ask for a crockpot since mine got snatched at the end of the party (luckily I got it back).

All in all, the Santa experience went well. The kids got what they wanted - a candy cane - and I got what I wanted - a nice picture with my kids sitting on Santa's lap.

The good laugh was just an added bonus :)

Wednesday, December 7, 2011

Pine Cone Hanging

Pretty much everything I make and end up posting here, whether it's food or crafts, I find on Pinterest, so I must give credit to that wonderful place. And here is yet another great Pinterest lead...

Since my cornstalk wreath was no longer in season - fall being over and all - I needed to spruce up the place with something new and festive, and I was still in the mood for a more earthy approach.  Luckily, at Michaels I stumbled upon some cinnamon-scented pine cones for super cheap and knew they would work perfect for something I had been planning to make: a pine cone hanging.

So here the crafting process begins:

I took my pine cones and dug through my extra ribbon stash for a few of the colors I wanted.
     

Then I warmed up my glue gun and put some glue on a ribbon strand...


...and pressed said strand onto one of the tops of a pine cone.


Some of the glue went through the ribbon and onto my fingers and it was a hot, sticky mess. But that's usually how it goes with most of my crafting projects :)

I continued on with as many ribbon strands and pine cones as I felt like. I made sure my ribbon lengths weren't all equal so there would be variation when the pine cones were hanging up.


Then I gathered up all the ribbon and organized them so my pine cones were hanging just as I wanted.


Tying the top of the ribbon strands in a knot to keep everything in place, I then made the top look sorta pretty by tucking in all the loose ends of ribbon so they weren't sticking up everywhere looking unraveled and such.


After looking at it, I decided to add a pop of Christmas color and took one of my daughter's old broken necklaces I had been saving for just this sort of occasion, and glued it into the middle of the knot.


And then I was done! I hung it over my door and we have been enjoying the cinnamon scent wafting from the pine cones throughout the day. Mmm smells like Christmas.


I'm not sure I'm a fan of the gold, silver, and white ribbon now that it's all said and done. When I look at my hanging, I keep wanting brighter ribbon to bring more of a cheery atmosphere and to really make the hanging pop, since the pine cones are pretty neutral.

Despite that, it was an easy, fun craft that cost me all of two dollars. It would have been free if I had gone and found my own pine cones, but I'm pretty sure any pine cones I would have found myself wouldn't have been as nice or smelled as good.

The original site I got the idea from used a picture frame to make hers and it's really cute, so check it out if you want more inspiration.

Monday, December 5, 2011

Cauliflower Pizza Crust Pizza

Feeling really adventurous, I decided to try the recipe on this site for a cauliflower pizza crust. Partly because I was intrigued, and partly because I had extra cauliflower. The reviews marks were positive so I had high hopes.

Because I don't have a food processor and you need riced cauliflower I had to grate my cauliflower.


I didn't like this part. It was hard and it hurt my fingers. That's why I need a food processor. Good thing I asked for one for Christmas :)

Anyway, after your cauliflower is all grated you put it in the microwave to steam it for a bit.


After it's done in the microwave, you start adding stuff to make the crust taste better and stick together.


Like cheese, beaten egg, crushed garlic (I used minced garlic), garlic salt, and oregano.

Mix it up, pour it out onto the pan and then spread it out.


I worked hard to spread it out as thin as possible because some of the reviewers said that in the thicker middle it stayed soggy and I don't like soggy pizza.

Next you cook the crust in the oven for awhile and once it's baked you pull it back out of the oven to put your desired toppings on.

Then you put it back in to broil the cheese and hopefully crispy up the crust a bit more.


And then it's done!


And you can serve up your healthy pizza!


What I noticed, even as I was serving, was that the crust really didn't get that firm where the sauce was on it and we definitely were going to have to eat it with forks because it would fall apart if we tried picking it up with our hands.

It tasted pretty good, just a little bit like cauliflower, but much better than I expected. It actually tasted a lot like cooked/burnt cheese - probably because of how much cheese you include in the actual crust mixture, and I like that flavor so I was good with it.

I didn't like the crust in the middle as much because it was too soggy. However, you can't taste the crust really because of how much sauce is there and it was just like eating the toppings by themselves with a fork.

I don't know if I would go out of my way to make this again, but if I have left over cauliflower I'm up for more experiments with this recipe. I would want to mess around with the cooking to see if I could get the crust firmer and crispier. If I'm on a major health kick and craving pizza major, I might try this again too. I'd give it three out of five stars and say for a healthy low-carb recipe it was pretty good.

If you want the full recipe check out this site.

Friday, December 2, 2011

Library Day

I've mentioned before that every Monday is library day. That means I pack up the kids and any library books or movies we have finished and walk through the Taylorsville park to the Taylorsville library close to our house. We usually arrive soon after it opens; around ten am. We return our books, choose new ones, and then take the long way around the park home for a brisk bought of exercise. Then we get to snuggle on the couch while I read the kids' new picks.

The kids love this day. They love walks and they love books and they love going places - which makes for a perfect time. I love it because I get quality exercise, some fresh air, and to pick out my favorite: new books!

However, the weather is getting cold and wet and I wasn't sure if we would be able to make it a few Mondays.  But after making a few adjustments, like waiting a bit longer for the rain to stop before leaving, or bundling up extra warm like this...


...we haven't been stopped yet! We've successfully gone each Monday morning. The weather is supposed to be even colder this coming Monday, but I'm thinking we'll still venture out. Because come rain, snow, or sunshine, you can bet that on Monday mornings you'll find us at the library. I know the librarians expect us since they always give me that familiar smile given to the regular, fellow-dedicated book lovers.

I highly recommend Library Day for everyone. It's good for the mind and the body, and I love how it helps to install a healthy love of reading and adventure in my children.

Though, I'm not so sure about Ammon's new genre of choice... :)